SupportTechnical Support, Technical Document
Using The KetuFile Help System Master Help File MiniHelp Files 1.0 Introduction 1.1 General Kryptographic Encoding and Transfer Utility - KETU KetuFile KetuFile Standard Version KetuFile Pro Version KetuFile Licensing 1.2 What Is Encryption ? 1.2.1 Introduction To Encryption 1.2.2 Encrypting Content Files 1.2.3 Encrypting Executables 1.3 Applications Of KetuFile 1.3.1 Email Attachments 1.3.2 Archiving 1.4 Install And Try Before You Buy 2.0 Installation and Specifications 2.1 Operating Systems 2.2 System Requirements 2.3 KetuFile Models 2.3.1 Models 2.3.2 Allowable Decryption Any Model Decrypts Any Encrypted File 2.4 The .ktu File Name Extension Turn OFF 'Known File Extension' Hiding Is Recommended 2.5 KetuFile Setup.EXE and Setup_beta.exe 2.5 Revision Information Rev.Txt 2.6 Revision Number 3.0 Quick Start 3.1 Registering Run The KetuFile Application 3.2 Encrypting Run The KetuFile Application (If Not Already Running) Select File To Be Encrypted - ORIGINAL File Enter A Key Start Encryption Send Encrypted File As An Email Attachment 3.3 Decrypting : Manual And Automatic Manual Approach To Decrypting - Run The KetuFile Application (If Not Already Running) Select Decryption Select File To Be Decrypted - ORIGINAL File Enter A Key Start Decryption Run Decrypted File Automatic Approach To Decrypting Automatic Approach To Decrypting An Email Attachment Run Decrypted File 4.0 Using KetuFile - Detailed Instructions 4.1 Main Dialog A General Note On 'Dialogs' A General Note On This Help Instruction Begin Description Of Controls/Boxes On This Dialog 'Edit' Boxes For File Name/Folder ORIGINAL File and RESULTING File Button, Browse For File Button, Browse For Folder Check Box, Use The Same Resulting Folder As The Last Time You Ran KetuFile Button, MiniHelp Button, Settings Button, Key Button, Encrypt Now or Decrypt Now Button, Select Encrypt OR Decrypt Button, Action/Email Button, Run Decrypted File Button, Info Button, OK Quit Program Begin Description Of Step-By-Step Operation Of This Dialog Registration Encrypt Or Decrypt Encryption: IMPORTANT NOTE Encryption: ORIGINAL File Encryption: RESULTING File Encryption: Key Encryption: Begin Actual Encryption Encryption: Send Encrypted File As Email Attachment Decryption: ORIGINAL File Decryption: RESULTING File Decryption: Key Decryption: Begin Actual Decryption Decryption: Run Decrypted File Decryption: Other Notes 4.2 Key Dialog A General Note On 'Dialogs' A General Note On This Help Instruction Begin Description Of Controls/Boxes On This Dialog 'Edit/Display' Box For The Key 'Edit' Box For Manually Entering Encryption/Decryption Key Check Box, See Key Display Of Nickname For The Current Key List Box, Load Previous Key, Nicknames Button, Delete Selected Nick 'Edit' Box, Enter NickName, No Spaces Button, Save Key Now Button, Minihelp Button, OK Button, Cancel Button, ClearKey Display Box, Key(bits) Begin Description Of Operation Of This Dialog Introduction Entering A Key Manually Loading A Key That Was Previously Saved With A Nickname Seeing Or Hiding The Key Clearing A Current Key Saving A Current Key With A Nickname Delete A Nicknamed Key That Is Saved On Your Hard Disk Completing The Key Entry Process 4.3 MiniHelp Dialog 4.4 Settings Dialog A General Note On 'Dialogs' 'OK' And 'Cancel' Buttons 'Edit' Box For Registration Key To Exit From Dialog Without Entering Registration Number Use Notepad.EXE Check Box Outbound Email Integration MAPI Alternate Email Approach (Manually Configured), General Info Finding The Email Default Client Alternate Email Approach, Command Alternate Email Approach, Switches Alternate Email Approach, Full Examples Action, General Info Action, Command Action, Switches Action, Checkbox, Use Process.Cmd Action, Use Process.Cmd and 'Final' Command Files Action, Detailed Examples Action Examples: Copy1, Copy Encrypted File, Same PC Action Examples: Copy1a, Copy Encrypted File, Same PC, Process.Cmd Action Examples: Copy2, Copy Encrypted File, To Another PC Action Examples: Copy2a, Copy Encrypted File, To Another PC, Process.Cmd Action Examples: Copy3, Copy Encrypted File, Same PC, Specify Destination Within Action Edit Box Action Examples: FTP1, Send Encrypted File by FTP To A FTP Server, Anywhere In The World 4.5 Action/Email Dialog 5.0 Security Considerations Introduction What Is A Key? Attacks Attacks - Brute Force Attacks - Intelligent Evolution Of Attacks Why KetuFile? Robustness Of AES Robustness Of KetuFile Back Doors Key Recovery Some Other Important Areas Of Security Key Selection Site Security - Computer Telephone Security Wireless Intrusion ELINT - Electronic Intelligence To Be Confident ... 6.0 Contact Information, Tech Support Using The KetuFile Help System Master Help File You are currently viewing the Master Help File. The Master Help File is a HTML file that is viewed by a traditional Web browser such as Internet Explorer or Navigator. It can be viewed online at: www.ketufile.com or it can be viewed on your computer from the copy that is installed with the KetuFile program. The Master Help file is a single HTML file so that you can easily download it or move it around as you need to. The file name is: KetuFile_Master_Help.html The Master Help file can be launched from the opening Dialog when you run the KetuFile program. This Dialog is called the Main Dialog and is Dialog #1. The Master Help file can also be viewed by double-clicking on the file in your KetuFile installation directory, or running your browser (Internet Explorer, Navigator, etc.) and using the File menu, choosing Open, then navigating to the KetuFile directory to select the Master Help file. MiniHelp Files MiniHelp Files are associated with specific Dialogs. They are accessed by clicking the MiniHelp button in any particular Dialog. These are simple text files, so you can also view them simply by double-clicking on them. Your operating system will recognize the .txt extension and launch a program such as Notepad to view them. 1.0 Introduction 1.1 General Kryptographic Encoding and Transfer Utility - KETU The KETU software products are intended to provide security and file transfer for information files and executable files that are commonly found on a personal computer (PC). This software is designed to run on PCs that use the Windows(tm) operating system. All Ketu products use the latest standard for encryption, the Advanced Encryption Standard (AES). AES allows encryption keys up to 256 bits. Certain Ketu products allow 512 bits, using double AES. NOTE: The KetuFile programs accepts keys that comprise uppercase and lower case letters and numbers. This results in an approximately 4-fold reduction of key states. Therefore a so-called KetuFile 256 bit key has approximately 2^252 states. A so-called KetuFile 512 bit key has approximately 2^508 states. The approximate number of possible keys for a 256 bit KetuFile key ( 2^252 ): a Trillion x Trillion x Trillion x Trillion x Trillion x Trillion The approximate number of possible keys for a 512 bit KetuFile key ( 2^508 ): a Trillion x Trillion x Trillion x Trillion x Trillion x Trillion x Trillion x Trillion x Trillion x Trillion x Trillion x Trillion A Trillion is defined (in the U.S.) as: 1,000,000,000,000 Two basic products, each with two variants, comprise the KETU product line. KetuFile This product allows a PC user to encrypt any file that resides on a PC. The user runs the KetuFile software and then selects, through a standard GUI interface (graphical user interface) the file that is to be encrypted. In addition, the user must enter an Encryption Key, which is a series of numbers and/or letters. KetuFile will then create an encrypted version of the original file. The original file is left in-tact on the user's hard disk. The user may then proceed with a number of other actions depending on the purpose of the encryption. For example, the user may place the encrypted file on some backup medium, such as tape. The user may send an email to another party and attach the encrypted file. The user must convey the Encryption Key to the recipient of the email by some means other than the email itself. Examples of this include: phone, fax, courier. KetuFile Standard Version This version of Ketu allows encryption of one file at a time. The maximum encryption key length is 256 bits ( 2^252 possible keys). KetuFile Pro Version This version of Ketu allows encryption of several files at one time. The maximum encryption key length is 512 bits ( 2^508 possible keys). KetuFile Licensing These products are "desktop" applications. As such they are simple stand-alone clients. A single license may be installed on a single machine. 1.2 What Is Encryption ? 1.2.1 Introduction To Encryption With regard to files on a computer, encryption can be: a] the process of hiding or obscuring the content of the files, or b] disallowing the execution of files that are termed 'executables'. There are many different types of files on a computer. Common examples of files that contain 'content' are: text files, word processor files, and spread sheets. Common examples of files that are 'executable' are: word processor application programs, utility programs such as image viewer programs, spread sheet programs, etc. 1.2.2 Encrypting Content Files Many times information in a word processor file can be highly confidential. An example is a common letter to another individual or company. It is often desirable to send this letter as an email attachment to an associate or client. To ensure that the risk of compromise of the letter's contents is minimized, encryption is used. Encryption for this type of 'content' file means 'scrambling' the characters in the letter in such a way that the result is senseless. It is important to understand, that when KetuFile encrypts a file, it actually creates a second file. This second file is the encrypted (scrambled) file. The original file is left intact on the computer's hard disk. KetuFile will give this second file a file name that is highly similar to the original file name. KetuFile will add 4 characters to the end of the original file name to form the encrypted file name. It will add .ktu Example: If the original file is info.doc, then the second file, the encrypted file would be info.doc.ktu This type of encrypting can be performed for almost any type of file on a PC that is operating with one of the Operating Systems (example Windows(tm) NT) for which KetuFile was designed to run. 1.2.3 Encrypting Executables There may be reasons to protect a file on a PC which is an executable. This means, scrambling the executable file so that it cannot run on the computer. As mentioned in the previous paragraph, when KetuFile encrypts a file, it actually creates a second, scrambled file. The original file is left intact on the computer's hard disk. Example: If the original file is comp.exe, then the second file, the encrypted file would be comp.exe.ktu 1.3 Applications Of KetuFile Following are two obvious examples of the use of KetuFile for encrypting files. 1.3.1 Email Attachments KetuFile can be used to encrypt files before they are transmitted to another person, organization or system. By encrypting the file(s), the information contained therein will not be available to an individual or entity that intercepts or somehow gains access to that encrypted file. A very common example of this is attaching files to an email. In this case, a sensitive file would be encrypted first. Then the encrypted file would be attached to the email for transmission. A key is used when encrypting a file. The party receiving the email would have to have the same key in order to decrypt the file. There is a convenience feature associated with saving keys with a nickname. When you encrypt a file, and the key has been saved-to or loaded-from a nickname, then the nickname is placed in the header of the encrypted file. This is NOT the key. It is simply a 'name' for the key that has been placed in the header. Later, when the encrypted file is to be decrypted, KetuFile will look in the header of that encrypted file to see if there is a nickname for a key. If there is, then KetuFile will look on your hard disk for such a nicknamed-key. If KetuFile finds such a nicknamed-key then it will load that key. This provides an efficiency when transferring a file. As an example, assume that you are sending documents as email attachments to the xyz company. By the use of telephone, fax, courier or personal contact, you tell your contact person at the xyz company that the key you will be using (a random sequence of letters and numbers), and you tell him/her that you will be saving that key on your hard disk with the nickname xyzco. Your contact person at xyz company manually enters that key into his/her KetuFile program (in the Key Dialog) and also uses the nickname xyzco. He/she does this just one time. Now your contact person receives an email (with attachment) from you (for almost all email programs) he/she can simply click on the attachment. The email program will tell the operating system (such as Win2k, etc.) to launch KetuFile and load the attached file. KetuFile will look in the header of that file, find the nickname, then load the nicknamed-key into the Key Dialog. You then have only to click, click, to start the decryption. As mentioned before, when typing a nickname for a key, just enter a name, such as xyzco. Don't add any punctuation or spaces. Don't worry about the .key extension. KetuFile will take care of that for you. KetuFile makes it easy to attach files to outgoing emails using your existing email client and Ketufile makes it easy to decrypt and read/use email attachments, again, using your existing email client. Furthermore, once you have decrypted an incoming email attachment, KetuFile makes it easy to read/review/run that attachment. 1.3.2 Archiving KetuFile can encrypt a file that is to be stored for archival purposes. By doing so, the storage location and infrastructure does not need the same degree of physical security as if the stored file were not encrypted. As more comapnies use the services of Storage Networks, the need for encryption of the files will increase. 1.4 Install And Try Before You Buy Anyone can download and install the KetuFile DEMO program and try it out. This will give a user an in-depth idea of what KetuFile can do. This also serves the important purpose of testing the compatibility of KetuFile with the particular PC hardware and PC operating system version. Download and install KetuFile before purchasing a license for it. 2.0 Installation and Specifications 2.1 Operating Systems KetuFile is designed for the Windows(tm) family of operating systems. Win 98, NT 4.0 SP6a, 2000, XP (tms) KetuFile will run on certain of the later versions of Win95 that have long file name support. Please download, install and run KetuFile as a DEMO program, prior to purchasing a license for it, regardless of the operating system. KetuFile was not written to run on the Mac(tm) operating system. Nevertheless it may be of interest to mention that, some users have Virtual PC running Windows on their Mac and report that KetuFile runs without problem. KetuFile can be downloaded, installed and run, prior to purchasing a license for it. 2.2 System Requirements - RAM: 10 megabytes - HD: 10 megabytes - Video Resolution: 800 x 600 minimum 2.3 KetuFile Models 2.3.1 Models There are 3 models of KetuFile. They are: DEMO, Standard, and Pro. These models allow the following capabilities. Maximum Allowed Sizes For These Files (Encryption): KetuFile Demo 100 kilobytes KetuFile Standard 10 megabytes KetuFile Pro 2 gigabytes Maximum Allowed Size Of Key: KetuFile Demo 8 bits KetuFile Standard 256 bits KetuFile Pro 512 bits NOTE: See the Introduction section above for more detail on the number of possible keys with the KetuFile 256 Bit keys and the KetuFile 512 Bit keys. 2.3.2 Allowable Decryption Any Model Decrypts Any Encrypted File The marketing philosophy behind the KetuFile product is that the decryptor is essentially free. A DEMO model KetuFile (download for free) can decrypt an encrypted file that has been encrypted by KetuFile DEMO or Standard or Pro model. A user only needs to download and install the DEMO program, then he/she can decrpyt KetuFile-encrpyted-files that were encrpyted with any of the license versions. This important functionality means that a user can 1] purchase, say, a KetuFile Pro license, 2] encrypt a sensitive file with a 512 bit key, 3] send this encrypted file as an email attachment to an associate who has not purchased KetuFile, and 4] tell the associate to download and install the free DEMO version of the KetuFile program and decrypt the file that was received as an encrypted email attachment. 2.4 The .ktu File Name Extension When KetuFile is installed, the .ktu file name extension is registered with the operating system. The .ktu extension exists on files that you have encrypted with KetuFile. The purpose of registering a file name extension with the operating system is to allow the user to double-click on such a file and have the operating system launch the correct application. In the case of KetuFile, this means that if KetuFile has been properly installed on your system, you can simply double-click on an encrypted file and have it launch the KetuFile application program. Example: Assume there is a file on your hard disk named: info.doc.ktu Using your "Windows My Computer" or your "Windows Explorer", you may simply double-click on info.doc.ktu and your operating system (Win 98, NT, Win 2000, XP, etc.) will run the KetuFile program and pass the info.doc.ktu file to it. KetuFile will then start running and load the info.doc.ktu file for you. This is described in greater detail in the Quick Start section of this help document where two important topics are discussed: a] Automatic Approach To Decrypting, and b] Automatic Approach To Decrypting An Email Attachment. Turn OFF 'Known File Extension' Hiding Is Recommended Your Operating System shows you the files on your hard disk using "Windows My Computer" or "Windows Explorer". When you are viewing the files you can set a number of 'viewing options'. One of the options is for Windows to hide the extension of the file name, where the extensions are 'well known'. For example, if a file name is: Resume.DOC Windows may show this just as: Resume Since KetuFile is a properly installed application program, its file extension (ktu) is registered and therefore Windows classifies it as 'well known'. We strongly recommend that you do not use this hiding feature. By not using this hiding feature you will always clearly see, for instance, a word processor document with it's .DOC file name extension, and an encrypted version of that same file with it's .DOC.KTU file name extension. How you turn this feature off will vary with the operating system. This is something your Computer System Administrator can help you with. In Windows NT, when you are looking at, say, My Computer display of the files on your hard disk, you will select the View pull down menu, select the Options menu item, then click the View tab. In Windows XP, when you are looking at, say, My Computer display of the files on your hard disk, you will select Tools, then Folder Options. 2.5 KetuFile Setup.EXE and Setup_beta.exe When KetuFile is downloaded from the KetuFile site or an authorized distributor's site, it comes as a single image. This means that the KetuFile program, Help files and installation wizards are all contained within this single file. The name of the file for public releases is Setup.EXE. The name of the file for Beta versions is Setup_beta.EXE. This Setup.exe (or Setup_beta.exe) file should be placed in a folder by itself, then executed. The installation wizard will then walk you through the install process. If you already have a version of KetuFile installed, you should use the Windows operating system facility (Add/Remove Programs/Software) to remove the current version of KetuFile. Re-install the new version into the SAME folder/directory. Your previous settings will be preserved, including various preferences and Keys. 2.5 Revision Information Rev.Txt A file is included with the installation that comments on the development status of the version of KetuFile that was just installed. 2.6 Revision Number When the KetuFile program is running you can click on the 'Info' button to see various information about KetuFile, it's installation on your computer and any files that you have prepared for decryption. The Revision Number is of the form: x.,y,z,w x is the Major Revision Number y is the Minor Revision Number z is a Build Number that we usually don't use at all. It is reserved for future use. w is the Build Number The Build Number is an odd number for Beta versions or pre-releases. The Build Number is an even number for general (public) releases. 3.0 Quick Start 3.1 Registering NOTE: If you are trying out the KetuFile program in the DEMO mode, just skip this registration (Section 3.1), but remember that you can only encrypt a small file (100 kilobytes max.) and only use a key of 8 bits (8 bits = 1 character). Run The KetuFile Application You may use the Windows 'Start' button, then select 'Programs' to find the KetuFile start shortcut or double click on the Desktop KetuFile shortcut or double click on the KetuFile.EXE icon in the KetuFile install directory. 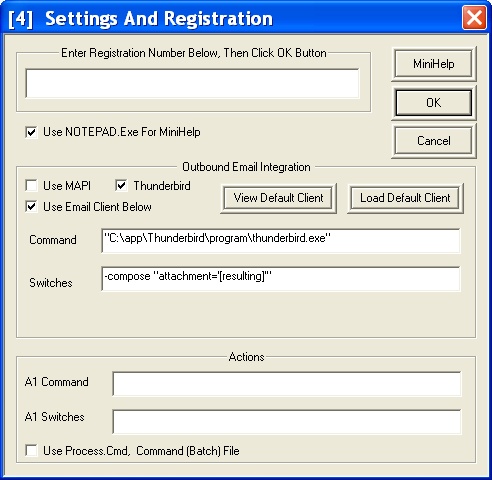 Click the Settings button. This will take you to the Settings And Registration Dialog (Dialog 4). Type in the Registration number in the box provided. Click the 'OK' button. You will be presented with a registration status Message Box. Click the 'OK' button on this box and this will take you back to the Main Dialog. 3.2 Encrypting Run The KetuFile Application (If Not Already Running) You may use the Windows 'Start' button, then select 'Programs' to find the KetuFile start shortcut or double click on the Desktop KetuFile shortcut or double click on the KetuFile.EXE icon in the KetuFile install directory.  Select File To Be Encrypted - ORIGINAL File On the KetuFile Main Dialog (Dialog 1) click the 'Browse For File' button and navigate to the file that you want to encrypt and double click on that file. Accept the RESULTING file that KetuFile suggests. Enter A Key  On the KetuFile Main Dialog (Dialog 1) click the 'Key' button. Now, on the Key Dialog (Dialog 2), type in a key in the upper edit box as a sequence of random numbers and letters. If you want to see the key you are typing, click the 'See Key' check box. Do not paste a key in from the Windows clipboard. If you want to save the key that you have entered, type a nickname for it in the lower right box then click the 'Save Key Now' button. When entering a nickname, just type a name with no spaces or punctuation such as: xyzco or jsmith. KetuFile will take care of adding the .key extension. It is recommended that you always save a key to a nickname to make subsequent decrypting faster. If you have previously saved a key then you don't have to type it in again. You can just double click on the nickname in the box on the lower left. Now click 'OK' to indicate that you are satisfied with the key and this will take you back to the Main Dialog (Dialog 1). Start Encryption Click the 'Encrypt Now' button. The status of the encryption will be shown on the lower left of the Dialog. Remember: KetuFile does not alter the ORIGINAL file that you are encrypting. That file is left in-tact on your hard disk. KetuFile has created a new file that is the encrypted file. Send Encrypted File As An Email Attachment You may, of course, run your email client (Outlook, Eudora, etc.) now and send an email with the encrypted file as an attachment. This will work reliably but is a bit of 'work' because you have to start your email client, open a new outbound email message, search/browse for the file that you just encrypted and designate it as the attachment. More efficiently, KetuFile, in most cases, will allow you to send the file you just encrypted with your existing email client using KetuFile's outbound email integration. If you have not changed your 'email integration settings' in the Settings Dialog Box, then KetuFile will be in the default state which means that it will attempt to use Microsoft 'MAPI' to connect to your email client. Now that you have encrypted the file, just click the Email/Action button on the Main KetuFile Dialog Box. You will now see a new Dialog Box: Action/Email. Just click the Email button. This will launch your existing email client and designate the encrypted file as an attachment. Now from within your email client, you can address the email and send it off. You can, of course, add normal text to the email but remember that this added text is not encrypted and you should NEVER send the Key in the email. The Key for the file you just encrypted, should be conveyed by phone, fax, postal mail, courier, etc. 3.3 Decrypting : Manual And Automatic There are 2 approaches to decryption - a manual approach and an automatic approach. Manual Approach To Decrypting - Run The KetuFile Application (If Not Already Running) You may use the Windows 'Start' button, then select 'Programs' to find the KetuFile start shortcut or double click on the Desktop KetuFile shortcut or double click on the KetuFile.EXE icon in the KetuFile install directory. Select Decryption Use the 'Select Encrypt OR Decrypt' button. Notice that when you click this button repeatedly that KetuFile toggles back and forth between Encrypt and Decrypt. There are 3 labels on this Main Dialog that change when you change between Encrypt and Decrypt. Select File To Be Decrypted - ORIGINAL File On the KetuFile Main Dialog (Dialog 1) click the 'Browse For File' button and navigate to the file that you want to decrypt and double click on that file. Accept the RESULTING file that KetuFile suggests. Enter A Key On the KetuFile Main Dialog (Dialog 1) click the 'Key' button. Now, on the Key Dialog (Dialog 2), type in a key in the upper edit box that is the very same sequence of random numbers and letters that was used to Encrypt the file. If you want to see the key you are typing, click the 'See Key' check box. If you want to save the key that you have entered, type a nickname for it in the lower right box then click the 'Save Key Now' button. When entering a nickname, just type a name with no spaces or punctuation such as: xyzco or jsmith. KetuFile will take care of adding the .key extension. It is recommended that you always save a key to a nickname to make subsequent decrypting faster. If you have previously saved a key then you don't have to type it in again. You can just double click on the nickname in the box on the lower left. Now click 'OK' to indicate that you are satisfied with the key and this will take you back to the Main Dialog (Dialog 1). Start Decryption Click the 'Decrypt Now' button. The status of the decryption will be shown on the lower left of the Dialog. Remember: KetuFile does not alter the ORIGINAL file that you are decrypting. That file is left in-tact on your hard disk. KetuFile has created a new file that is the decrypted file. Run Decrypted File If you wish to, click The 'Run Decrypted File' Button to cause the Windows operating system to run the correct application for the file you just decrypted and see it on screen. Automatic Approach To Decrypting This approach assumes that when the file was encrypted, that the key was saved to a nickname, and that that very same key is now on the hard disk of your computer with the same very same nickname. Using your operating system Explorer or My Computer, double click on the encrypted file. It will have a .ktu extension. KetuFile will be run, the encrypted file will be loaded into KetuFile and KetuFile will load the nicknamed-key. You will be presented with an explanatory Message Box that will put you just 2 clicks away from decrypting. Automatic Approach To Decrypting An Email Attachment This approach assumes that when the file was encrypted, that the key was saved to a nickname, and that that very same key is now on the hard disk of your computer with the same very same nickname. This will work for almost all email programs. In the email that you have received, click on the attached, encrypted file. This will usually be a file name or an icon with file name at the bottom of the email message. It will have a .ktu extension. KetuFile will be run, the encrypted file will be loaded into KetuFile and KetuFile will load the nicknamed-key. You will be presented with an explanatory Message Box that will put you just 2 clicks away from decrypting. Run Decrypted File After you have decrypted the file, if you wish to, click The 'Run Decrypted File' Button to cause the Windows operating system to run the correct application for the file you just decrypted and see it on screen. 4.0 Using KetuFile - Detailed Instructions 4.1 Main Dialog A General Note On 'Dialogs' When you are running the KetuFile program, you are looking at a presentation of information and controls in a rectangular display. This is called a 'Dialog'. Each Dialog has a number and a name. At the top left of the Dialog there is a number in square brackets. If the number is shown as [1] then that Dialog would be referred-to as, Dialog 1. Immediately to the right of the number, is the name of the Dialog. A General Note On This Help Instruction This instruction will first give a brief description of each of the boxes, controls, buttons, etc. in this Dialog. Then a description of how to use the Dialog is given. Begin Description Of Controls/Boxes On This Dialog 'Edit' Boxes For File Name/Folder There are 2 Edit boxes for file names in this Dialog. The titles of these boxes change depending on whether you want to encrypt or decrypt. An 'Edit box' both presents text information to you and allows you to edit/change that information. You may enter a file and/or path in either of the boxes, or Click the associated 'Browse' button and search for the file or folder. ORIGINAL File and RESULTING File Whether you are encrypting or decrypting, you always start with the ORIGINAL File (in the upper Edit box) and end up with the RESULTING File (in the lower Edit box). Maximum Allowed Sizes For These Files: KetuFile Demo 100 kilobytes KetuFile Standard 10 megabytes KetuFile Pro 2 gigabytes The first (upper) Edit box holds the ORIGINAL file. When you are encrypting, the ORIGINAL file is the file as it exists on your system before encryption. In the world of encryption and ciphers, this is sometimes referred-to as the 'Clear Text' file. This is a bit of a misnomer because this file does not have to be text. It can be a spread sheet, graphics file, executable file and any other type of file. When you are decrypting, the ORIGINAL file is the encrypted file. In the world of encryption and ciphers, this is sometimes referred-to as the 'Ciphered Text' file. This is a bit of a misnomer because this file is not text. The second (lower) Edit box holds the RESULTING file. When you are encrypting, the RESULTING file is the file after the encryption process. The so-called 'Ciphered Text'. If you use 'MAPI Outbound Email Integration', it is this file that will be passed to your email client as an attachment. When you are decrypting, the RESULTING is the file after the decryption process. The so-called 'Clear Text'. Button, Browse For File This Button is associated with the first edit box (upper edit box). This Button allows you to browse for a file that is to be encrypted or decrypted, the ORIGINAL file. Button, Browse For Folder This Button is associated with the second edit box (lower edit box). This Button allows you to browse for a folder in which the RESULTING file will be placed. Check Box, Use The Same Resulting Folder As The Last Time You Ran KetuFile When you select a file for the ORIGINAL file, KetuFile will suggest a file name and file location for the RESULTING file. KetuFile will suggest that the RESULTING folder be the same as the ORIGINAL. If you set this Check Box, then KetuFile will suggest the previous folder location. 'Previous' here means a folder that you used previously. Button, MiniHelp This Button pops-up Dialog 3, the Text Browser that allows you to scroll through a quick help instruction. Button, Settings This Button pops-up Dialog 4, which allows you to input the registration number and select other User preferences. Button, Key This Button pops-up Dialog 2, the Key entry Dialog where you enter or load the encryption/decryption key for either Encrypting or Decrypting. Button, Encrypt Now or Decrypt Now The title of this button is toggled between 'Encrypt Now' and 'Decrypt Now' when you Click the 'Select' button. The 'Select' Button is described in the next item. The 'Encrypt Now' / 'Decrypt Now' button begins the Encryption or Decryption process. Progress on Encryption or Decryption is shown near the bottom of this Dialog, Dialog 1. Button, Select Encrypt OR Decrypt Clicking this button changes (toggles) 3 titles on this Dialog box: 1] title of first (upper) Edit Box, 2] title of second (lower) Edit Box, 3] title of the Encrypt/Decrypt Now button. Button, Action/Email After you have encrypted a file, you may wish to send it as an attachment to an email, or perhaps process it in some other way. This button will allow you to proceed in that manner. Also, this Button will allow you to perform certain email or other tasks even if you have not just encrypted a file. Clicking this button will bring up another Dialog Box that gives you choices. Button, Run Decrypted File After you have decrypted a file, back to its initial condition, you may wish to 'Run' that file immediately. Here are 2 examples: Someone has sent you a confidential text file. You have just decrypted it. The file name of that text file is in the lower Edit box, right now. Let's say that the file name is: C:\dir\info.txt You wish to read it, right now. Just Click the Button 'Run Decrypted File'. KetuFile will send that file name to your Windows operating system. The operating system will see that the extension of the file name is txt and it will run your text editor (usually Notepad) with the file and you will immediately see it on screen. Someone has sent you a confidential Excel spreadsheet file. You have just decrypted it. The file name of that text file is in the lower Edit box, right now. Let's say that the file name is: C:\dir\data.xls You wish to view the spreadsheet right now. Just Click the Button 'Run Decrypted File'. KetuFile will send that file name to your Windows operating system. The operating system will see that the extension of the file name is xls and it will run your Excel program with the file and you will immediately see it on screen. This Button, 'Run Decrypted File' will only work when your KetuFile program is in the Decrypt mode. Also, if the file extension of the file name that is in the lower Edit box is ktu then this Button will not work. Button, Info This button presents information relative to the basic, installed KetuFile program as well as files that may be ready for encryption or decryption. Data included is: KetuFile Model Type, KetuFile Version, Registration Number, Operating System Environment Variable KETUFILE, the Command Line data that the Operating System passed to the KetuFile program when it launched KetuFile, ORIGINAL File, RESULTING File, NickName as currently set within this session of KetuFile, NickName Read from the header of an encrypted file that is shown in the ORIGINAL file Edit box, Install Directory of KetuFile, the Operating System Current Directory, Header Of Designated Encrypted File shown in the ORIGINAL Edit box. NOTE: the Header information of an encrypted file is NOT itself, encrypted. Button, OK Quit Program Causes the KetuFile program to quit (end). Begin Description Of Step-By-Step Operation Of This Dialog Please read all of the above information on the various controls, edit boxes, etc. before reading this section on operation. Registration Press the 'Settings' Button to allow entry of your Registration Number. There is a MiniHelp Button on the Settings Dialog (Dialog 4) to explain Registration. Encrypt Or Decrypt Click the 'Encrypt Now' / 'Decrypt Now' Button for the operation that you desire. The following discussion will present a description for encryption, then a description for decryption. Encryption: IMPORTANT NOTE When you encrypt a file, KetuFile is creating ANOTHER file that is encrypted. The file that you started with is left UNALTERED on your hard disk. Encryption: ORIGINAL File The ORIGINAL file is the one you want to encrypt. It can be any PC file, such as: text, word processor, spread sheet, executable, batch, image, web page, etc. Remember there are limitations on the size of the file you can encrypt or decrypt, depending on the model of KetuFile that you are using. These are specified above in the section on ORIGINAL File and RESULTING File. You can enter a file name manually of use the 'Browse For File' Button to pop up a familiar search Dialog that allows you to navigate your hard disk, and in most cases, your Network Neighborhood, to find the file. If you enter the file name manually, as a 'name only', then KetuFile will assume that the file is in the Current Directory (Current Folder). An example of a 'name only' would be: info.txt If you enter the file name manually, as a 'full path name', then KetuFile will not have to make any assumptions and will find that precise file at the location (folder) you have specified. An example of a 'full path name' would be: C:\data\info.txt The Current Directory is either, the directory that KetuFile is stored in (installed in) or if your are decrypting and started the KetuFile program by double-clicking on an encrypted file that ended with the extension .ktu then the Current Directory will be the directory (folder) that the encrypted file resides in. It is recommended that you use the 'Browse For File' button to specify the ORIGINAL File. Important Note: The first time that you start KetuFile, it will use the Current Directory (Current Folder) as the starting point for your search for a file using 'Browse For File'. KetuFile will remember the directory (folder) that you specify, so the next time you start KetuFile it will not go back to the Current Directory. Encryption: RESULTING File KetuFile will suggest a file name and location (folder) for the RESULTING file. If possible, use this suggestion. If the location (folder) where the RESULTING file is to be placed is other-than the suggestion, you may use the 'Browse For Folder' Button to navigate to the desired location (folder). The suggested RESUTLING file name is created by taking the ORIGINAL file name and adding .ktu extension. Example: ORIGINAL File is: C:\data\info.txt RESULTING File suggestion: C:\data\info.txt.ktu STRONG RECOMMENDATION: Do not change the .ktu extension on the suggested name of the RESULTING File. Doing so will defeat certain important convenience features of the KetuFile program, such as allowing you to double click on a file with .ktu extension and cause the KetuFile program to run. Encryption: Key Click the 'Key' Button to allow you to enter/designate the encryption/decryption key. There is a MiniHelp Button on the Key Dialog (Dialog 2) to explain Key entry/designation. Encryption: Begin Actual Encryption Click the 'Encrypt Now' Button. Progress on the encryption is shown on the bottom left of this Dialog. Encryption: Send Encrypted File As Email Attachment Now that you have created an encrypted version of the original file, there resides on your hard disk a file whose full path name is shown in the Resulting edit box. You may send this file as an email attachment using your 'currently installed' email client, such as Outlook or Eudora. Click the Action/Email button to see the Action/Email Dialog Box. Then within that Dialog Box, click Email. You should now see your email client launched or brought to the forefront and a new message is ready to send and the encrypted file is shown as an attachment. You may now enter an email address in that message and proceed to send the email. Note that the Settings Dialog box controls how this Email button works. If the Settings box has 'MAPI' selected then this is the most automatic way to send an email. In addition, there are various other special capabilities of the Action/Email Dialog box that are described in the section of this document for that Dialog. Decryption: ORIGINAL File The ORIGINAL file is the one you want to decrypt. It will usually have the .ktu extension. Remember there are limitations on the size of the file you can encrypt or decrypt, depending on the model of KetuFile that you are using. These are specified above in the section on ORIGINAL File and RESULTING File. You can enter a file name manually of use the 'Browse For File' Button to pop up a familiar search Dialog that allows you to navigate your hard disk, and in most cases, your Network Neighborhood, to find the file. If you enter the file name manually, as a 'name only', then KetuFile will assume that the file is in the Current Directory (Current Folder). An example of a 'name only' would be: info.txt.ktu If you enter the file name manually, as a 'full path name', then KetuFile will not have to make any assumptions and will find that precise file at the location (folder) you have specified. An example of a 'full path name' would be: C:\data\info.txt.ktu The Current Directory is either, the directory that KetuFile is stored in (installed in) or if your are decrypting and started the KetuFile program by double-clicking on an encrypted file that ended with the extension .ktu then the Current Directory will be the directory (folder) that the encrypted file resides in. It is recommended that you use the 'Browse For File' button to specify the ORIGINAL File. Important Note: The first time that you start KetuFile, it will use the Current Directory (Current Folder) as the starting point for your search for a file using 'Browse For File'. KetuFile will remember the directory (folder) that you specify, so the next time you start KetuFile it will not go back to the Current Directory. Decryption: RESULTING File KetuFile will suggest a file name and location (folder) for the RESULTING file. If possible, use this suggestion. If the location (folder) where the RESULTING file is to be placed is other-than the suggestion, you may use the 'Browse For Folder' Button to navigate to the desired location (folder). The suggested RESUTLING file name is created by removing .ktu extension. Example: ORIGINAL File is: C:\data\info.txt.ktu RESULTING File suggestion: C:\data\info.txt Decryption: Key Click the 'Key' Button to allow you to enter/designate the encryption/decryption key. There is a MiniHelp Button on the Key Dialog (Dialog 2) to explain Key entry/designation. Remember, you must use the exact key to decrypt that was used to encrypt. Remember also that 'case' is important for letters. Example: the lower case letter a is entirely different from the upper case letter A. Decryption: Begin Actual Decryption Click the 'Encrypt Now' Button. Progress on the encryption is shown on the bottom left of this Dialog. Decryption: Run Decrypted File KetuFile has the ability to 'run' a file after it has been decrypted. Examples are: If the file is a text file, then 'running' it means to run a text editor and pass the file to it. If the file is a spreadsheet, such as Excel, then 'running' it means to run Excel and pass the spreadsheet file to it. As long as the Windows operating system 'understands' the extension of the file name, it will know what program to run in order to 'run' that file. For example, Excel spreadsheets have XLS as the extension of their file names, so Windows knows to run Excel in order to show you this file. Decryption: Other Notes On most Windows(tm) operating systems, when KetuFile is installed, the .ktu file extension will be associated with the KetuFile program. In most cases, this allows you to double click on an encrypted file and have the KetuFile program start running. In addition, in most cases, the name of the ORIGINAL file will be loaded into the appropriate edit box. When Dialog 1 is set for Decryption, and an encrypted file is shown in the ORIGINAL File edit box, you can Click the Info Button and read the header of the encrypted file. The header of an encrypted file is not itself, encrypted. 4.2 Key Dialog A General Note On 'Dialogs' When you are running the KetuFile program, you are looking at a presentation of information and controls in a rectangular display. This is called a 'Dialog'. Each Dialog has a number and a name. At the top left of the Dialog there is a number in square brackets. If the number is shown as [1] then that Dialog would be referred-to as, Dialog 1. Immediately to the right of the number, is the name of the Dialog. A General Note On This Help Instruction This instruction will first give a brief description of each of the boxes, controls, buttons, etc. in this Dialog. Then a description of how to use the Dialog is given. Begin Description Of Controls/Boxes On This Dialog 'Edit/Display' Box For The Key The Edit/Display box (upper left of Dialog) displays a Key and allows you to edit it as desired. 'Edit' Box For Manually Entering Encryption/Decryption Key If you are entering a key for the first time, enter it in the upper left box. Enter numbers and letters. Remember that upper case letters are different from lower case letters. More information on Keys is given in the sections on operation, below. NOTE: When you have a Key in the above box, it is referred-to as the 'Current Key'. Check Box, See Key Each time you initially open the Key Dialog, this Check Box will be unchecked. The result of this is that the characters in both of the Edit/Display boxes will be shown as asterisks, not the actual numbers and letters. As with any entry of 'something secret', it is important to protect against someone looking over your shoulder. It you click this Check Box to the 'checked' state, the actual characters will be shown. Display Of Nickname For The Current Key Immediately below the Display box that shows the Key you will see the Nickname of the current Key, if in fact the current Key was loaded from a Nickname rather than one you entered manually this time. List Box, Load Previous Key, Nicknames This box (Nickname List box) is located in the lower left of the Dialog. It shows the Nicknames of previously saved Keys. If you want to use one of those Keys for encryption or decryption, just double click on the Nickname in the list box. The Key will be loaded and you will see it appear in the previously discussed Key Edit/Display box (upper left of Dialog). Button, Delete Selected Nick If there is a Nickname shown, and selected, in the previously discussed Nickname List box that you wish to delete, then click this Button to delete it. 'Edit' Box, Enter NickName, No Spaces This 'Edit' box is in the lower right of the Dialog. If there is a Key currently in the previously discussed Key Edit/Display boxes (upper left of Dialog), you may save that Key for future use. You have to give it a NickName. Here is where you enter that NickName. Remember, this is just a nickname and as such should not bear ANY resemblance to the numbers and letters that are in the Key itself! Be cautious, be safe! Button, Save Key Now If there is a Key in the previously discussed Key Edit/Display boxes (upper left of Dialog), and you have entered a Nickname in the previously discussed Enter Nickname Edit box (lower right of Dialog), Then clicking this button will save the Key to your hard disk. Button, Minihelp This Button pops-up Dialog 3, the Text Browser that allows you to scroll through a quick help instruction. Button, OK Clicking this Button, quits this Dialog keeping any Key that you have designated. Button, Cancel Clicking this Button, quits this Dialog and does NOT keep Key. Button, ClearKey Clicking this Button, clears the Key so you can re-enter, re-load etc. Display Box, Key(bits) This box shows the Key length in bits. Begin Description Of Operation Of This Dialog Introduction When you encrypt a file, there is a Key that specifies how your file is enciphered to make the ciphered version of your file, unreadable or in the case of encrypting an executable file, making the file un-runnable. This is the same Key that is used for the decryption process. This Key is referred-to as the Encryption/Decryption Key or simply, the Key. IMPORTANT NOTE: When you encrypt a file, KetuFile is creating ANOTHER file that is encrypted. The file that you started with, is left UNALTERED on your hard disk. Entering A Key Manually In the 'Edit' box for Keys (upper left of Dialog), enter RANDOM letters and numbers. If you use words/phrases from ANY language, your encrypted file will be BILLIONS of times easier to crack! As you enter the Key, you will see the Key Bits Display box showing the length (in bits) of the Key you have entered thus far. Loading A Key That Was Previously Saved With A Nickname First select the Nickname in the Nickname list box (lower left of Dialog) by double clicking on it. The Key will immediately show up in the Key Edit/Display box (upper left of Dialog). Seeing Or Hiding The Key By clicking the See Key Check Box, you can toggle between seeing the actual characters in the Key or seeing asterisks. Clearing A Current Key If a Key is currently in the Key Edit boxes, you can clear it by clicking the Clear Key Button. It will also clear the Key Bits Display box. Saving A Current Key With A Nickname If a Key is currently in the Key Edit box, you can save it to your hard disk with an associated Nickname. For example, if you wish to save a Key that you use for documents associated with the XYZ Company, you might use the Nickname: xyzco Each Nickname is saved to your hard disk as a file. The actual file name of this NickName would be: xyzco.key Don't be concerned with the .key extension on the file name. KetuFile will take care of that for you. Just specify a Nickname and let KetuFile add the .key extension. To save a Current Key, simply enter a Nickname in the Enter Nickname, No Spaces Edit box (lower right of Dialog). Then Click the Save Key Now Button. Delete A Nicknamed Key That Is Saved On Your Hard Disk All Nicknamed (Saved) Keys are shown in the Load Previous Key List box (lower left of Dialog). If you want to delete one of them, select it by clicking it one time, then click on the Delete Selected Nick Button. Completing The Key Entry Process After you have manually entered a Key or loaded a saved (Nicknamed) Key, click the OK Button to indicate that you are ready to use that Key for encryption or decryption. If you change your mind and don't want to use the Current Key, click the Cancel Button. 4.3 MiniHelp Dialog The MiniHelp Dialog is a quick reference guide to using a particular Dialog, i.e. there is a separate MiniHelp for each of the Dialogs. 4.4 Settings Dialog A General Note On 'Dialogs' When you are running the KetuFile program, you are looking at a presentation of information and controls in a rectangular display. This is called a 'Dialog'. Each Dialog has a number and a name. At the top left of the Dialog there is a number in square brackets. If the number is shown as [1] then that Dialog would be referred-to as, Dialog 1. Immediately to the right of the number, is the name of the Dialog. IMPORTANT NOTE On Seeing the Current Registration Number If you wish to see the current Registration number, you can view it by returning to Dialog 1, the main KetuFile Dialog, and clicking on the Info Button. NOTE On Demo Mode Of Operation Prior to a valid Registration Number being entered in this Dialog, KetuFile will operate in the Demo Mode. If an invalid Registration Number is entered, KetuFile will remain in the Demo mode. If a valid Registration Number is currently in effect and an invalid number is entered, it will place KetuFile back into the Demo mode, until a valid Registration Number is entered. The Settings Dialog is divided into 3 principle areas: 1) the top area that includes the edit box for the Registration Number, the viewer to use for MiniHelp, and a few buttons on the right, 2) the middle area that is enclosed in a box, that has the settings for outbound email integration, i.e. sending encrypted files as attachments to an email, and 3) the lower area, that is enclosed in a box, for the 'Actions' settings. 'OK' And 'Cancel' Buttons These buttons both allow you to quit this Dialog. By clicking the 'OK' Button you will quit this Dialog and save any changes that you have just made. By clicking the 'Cancel' Button you will quit this Dialog and not save any changes that you have just made. 'Edit' Box For Registration Key At the top of the Settings Dialog, enter the Registration Number in the Edit Box, then Click the OK Button. KetuFile will respond to this action by popping up a message box that tells you the Model that you have enabled. An exit code of 777 means that a valid code was entered. An exit code of 999 means that an invalid code was entered. To Exit From Dialog Without Entering Registration Number To Exit From Dialog Without Entering Registration Number, click the Cancel Button. Use Notepad.EXE Check Box Near the top of the Settings Dialog, a check box allows you to use the operating system text editor or the KetuFile built-in text browser, for the MiniHelp screens. The advantage of using the operating system text editor, such as Notepad.EXE, is that you may simultaneously view the MiniHelp information and interact with the Dialog boxes. Outbound Email Integration These settings are in the center of the Settings Dialog, enclosed in a box. On the left there are two check boxes. You may choose one or the other. MAPI If you choose MAPI, then that is all you have to do. The other edit boxes associated with outbound email integration are ignored. MAPI is the first choice to try. It is the default setting when KetuFile is installed. It will work with most of the Windows operating systems and their variations and service packs. MAPI relies on your PC having an email client software installed (Outlook, Eudora, etc.) that is considered by the Windows operating system to be the 'default mail client' and MAPI relies on that mail client being MAPI compliant. NOTE: 'default mail client' and default email client' are synonymous. MAPI stands for Messaging Applications Program Interface. It is both a 'standard' and a piece of software provided by Microsoft. It is intended to simplify and standardize the interfacing of one application program, such as KetuFile, to another application program, such as Outlook or Eudora. KetuFile has been tested with various email clients and various Windows operating systems using the MAPI interface. It has been found to work well with many of these, with Outlook and Eudora having near-perfect interoperability. MAPI is not the only approach to outbound email integration with KetuFile. An Alternate Email Approach is also available. If the Check Box for MAPI (Use MAPI) is indeed checked, then the Buttons, Edit Boxes and Labels for the Alternate Email Approach are not operable and they are "grayed-out". When you click on the alternate email Checkbox (Use Email Client Below), then the associated Buttons, Edit Boxes and Labels for the alternate email approach are operable and they are no longer "grayed-out". Alternate Email Approach (Manually Configured), General Info NOTE: In the following discussion, reference will be made to 'commands', 'switches', 'command line interface', etc. In most of your work on a PC, you are interacting with a graphical environment. There are lots of pretty graphics, sculpted buttons and controls, and you 'mouse and click' your way to success. There is also a 'command line interface' in the PC, sometimes referred-to as the 'DOS command line' that allows you to do certain tasks in a simple text-scrolling environment. This environment includes running various programs, such as a mail client. In addition, a program that is already running, such as KetuFile, can access this command line interface, and run other programs, such as mail clients. This is in fact how KetuFile accomplishes outbound email integration using the 'Alternate' approach that we are now about to discuss. In the Settings Dialog, in the middle section, you may click on the 'Use Email Client Below' checkbox. This is the 'Alternate' approach. Now you must enter data into the two edit boxes that are labeled 'Command' and 'Switches'. If you are familiar with the 'command line interface' to your email client, then you probably know what to enter here, but you may wish to at least skim the detailed explanation that follows. Finding The Email Default Client Regardless of whether your email client is MAPI compliant or not, it may still be the 'registered' default mail client. In that case, it may have registered in the Windows Registry, it's existence and, most importantly, the exact settings (commands) necessary to launch it from the command line. If the developer of the email client has indeed properly registered the mail client then you can view this using a button on the Settings Dialog. On the Settings Dialog, within the Outbound Email Integration box, there is a button labeled 'View Default Client'. If you click this button, KetuFile will attempt to find the command to issue on the command line interface, to launch the default mail client. This will be shown to you below the Switches edit box. For example, a typical command for Eudora might be: C:\Program Files\Eudora\Eudora.exe Another example, a typical command for Outlook 2003 might be: C:\Program Files\Office\Office11\Outlook.exe /recycle There is another Button in this area that says 'Load Default Client', clicking it will take the same information retrieved by the 'View' button and it will place that information in the Command edit box. Alternate Email Approach, Command The 'Command' is typically the full path file name to the executable of the mail client that runs the program. In most cases this command can be issued regardless of whether the mail client program is already running or not. Notice in the above example for Outlook 2003, that there was a 'switch' included. It was: /recycle In most cases we do not want any 'switches' in the 'Command' edit box. As a matter of fact, for Outlook 2003 we do not need the /recycle switch at all. While this discussion has shown how to automatically retrieve the 'default mail client' that has been registered in the Windows Registry, in fact we can manually type any full path file name for the executable of a mail client into the 'Command' edit box. KetuFile will memorize that setting when the OK button is clicked on the Settings Dialog. NOTE: Clicking the Cancel button will cause any changes made to not be saved. As an example of this manual setting, assume that the mail client is called 'Pine' and assume that it is on the hard disk as follows: C:\app\Pine\bin\Pine.exe We would then want to type the above full path name to the executable, into the edit box for 'Command'. Alternate Email Approach, Switches The 'Switches' are information that the Windows operating system passes to the software that is being loaded and run. They are typically 1] a slash, followed by one or more letters, or, 2] a slash, followed by one or more letters, followed by a single blank space, followed by more information. In the case of many email clients, including Outlook and Eudora, the switch, /a is used to designate that there is a specific file that is to be attached and the full path file name to that file follows the /a switch, separated by a blank. These switches should be included in the 'Switches' edit box on the Settings Dialog, not in the 'Command' edit box. After the /a switch (most) mail clients will be looking for the file-to-be-included. Since you do not want to be constantly typing the file to include, KetuFile provides a keyword substitution. This means that after the /a switch, you would type the keyword and KetuFile will always substitute the correct full path file name. NOTE: Do not confuse these keywords with the encryption Keys that are used for encrypting and decrypting. There are currently 2 keywords defined, they are: [original] [resulting] These keywords refer-to the edit boxes that are on the KetuFile Main Dialog. In the case when you are encrypting, the [original] keyword will cause the substitution of the full path file name of the unencrypted file in the upper, 'original' edit box. In addition, in the case when you are encrypting, the [resulting] keyword will cause the substitution of the full path file name of the encrypted file in the lower, 'resulting' edit box. When you want to send an encrypted file as an email attachment, you will be using the [resulting] keyword. IMPORTANT NOTES: - The square brackets are a part of the keyword so be sure to include them. - Do not include blank spaces within the keyword. - If possible, try to avoid folders and file names that have blanks in them for the files that are being encrypted. KetuFile will work with these in almost all cases, but it can cause problems with some email clients and/or some of the Windows operating system variants. - In the case where you have blank spaces within the file name or directory (folder) path, you may want to use double quotes around the keyword, specifically, you may want to place double quotes outside of the square brackets, as in the following example: "[resulting]" - In addition to the customization possible with the Alternate Email approach, you actually may also use the Action feature of Ketufile to send an email. While the Action feature was intended for interfacing to other programs such a FTP (file transfer protocol) and backup/archive programs such as zip programs, the Action feature could also be used for interfacing to an email client. Some of the possible motivations for doing this (using Action feature to send an email) are: 1) you use the basic Email capability to interface to one of your email clients and use the Action capability to interface to a different email client, 2) Interfacing to your email client does not work with the Email integration of KetuFile, but the Action feature includes the "Process.Cmd" option that allows greater capability with certain of the Windows operating systems. Alternate Email Approach, Full Examples Here are full examples for Outlook 2003 and Eudora. Note that the locations of these executable files might be different on your computer. First the Outlook example: Command Edit Box: C:\Program Files\Office\Office11\Outlook.exe Switches Edit Box: /a [resulting] NOTE: There is only one blank space between the /a and the keyword. Eudora example: Command Edit Box: C:\Program Files\Eudora\Eudora.exe Switches Edit Box: /a [resulting] NOTE: There is only one blank space between the /a and the keyword. As a note, you can also accomplish outbound email integration with the KetuFile 'Action' capability, which will be described next. The Action approach allows using a Command file (batch file) as an intermediary in running various other programs and as such is more flexible and adaptable. Action, General Info The KetuFile 'Action' capability is similar to the Alternate Email capability. It allows the running of some other executable file, such as an application program or command file (batch file), conveniently from within the KetuFile program. In addition, the 'Action' capability allows including the same keywords as the Alternate Email capability. In the Settings Dialog you will notice that the 'Action' settings are at the bottom of this dialog in their own enclosing box. There are 3 items within this box: 1] a Command edit box, 2] a Switches edit box, and 3] a check box for using the Process.Cmd command file (batch file). Please read the preceding sections on the Alternate Email capability since it contains much of the basic explanation of KetuFile running another executable program through the 'command line interface'. Action, Command The 'Command' is typically the full path file name to the executable of the program or command file (batch file) that you wish to run. Action, Switches The 'Switches' are information that the Windows operating system passes to the software that is being loaded and run. They are typically 1] a slash, followed by one or more letters, or, 2] a slash, followed by one or more letters, followed by a single blank space, followed by more information including possibly more slash and letters. Action, Checkbox, Use Process.Cmd KetuFile can directly issue commands through the Windows 'command line interface'. The way that Windows responds can be a little bit different, depending upon the particular operating system. If this checkbox is checked, then KetuFile will create a command file (batch file) called Process.Cmd. In that command file, KetuFile will assemble the commands and switches that are in the two (previously described) edit boxes. Then KetuFile will run the Process.Cmd file, and Process.Cmd will cause the execution of the appropriate executable, whatever that executable might be. Action Procedural Example, NO Process.Cmd used In this example, an encrypted file has been decrypted, and the 'resulting' file is a text file that the user wants to look at. The full path file name of the resulting file that is currently showing in the Resulting edit box of the Main dialog is: C:\data\letter.txt Action Command Edit Box: C:\app\GoodEdit\GoodEdit.exe Action Switches Box: [resulting] Checkbox for Process.Cmd: NOT checked When the user clicks the Action/Email button on the KetuFile Main Dialog, then clicks the Action button: - KetuFile will send a command to Windows which is: C:\app\GoodEdit\GoodEdit.exe C:\data\letter.txt - Windows will run GoodEdit.exe and pass it the letter.txt file name. - The user will see GoodEdit.exe start and the letter.txt contents displayed. Note: If the above example is really what you need to do, don't forget that KetuFile has a built-in capability for 'running' a decrypted file. It is the button on the Main Dialog: 'Run Decrypted file'. This capability is described in the operation section for the Main Dialog. Action Procedural Example, WITH Process.Cmd used In this example, an encrypted file has been decrypted, and the 'resulting' file is a text file that the user wants to look at. The full path file name of the resulting file that is currently showing in the Resulting edit box of the Main dialog is: C:\data\letter.txt Action Command Edit Box: C:\app\GoodEdit\GoodEdit.exe Action Switches Box: [resulting] Checkbox for Process.Cmd: IS checked When the user clicks the Action/Email button on the KetuFile Main Dialog, then clicks the Action button: - KetuFile will create a file named Process.Cmd whose contents is: C:\app\GoodEdit\GoodEdit.exe C:\data\letter.txt - KetuFile will send a command to Windows which is: Process.Cmd - Windows will first run Process.Cmd, then - As Process.Cmd is executing, Windows will run GoodEdit.exe and pass it the letter.txt file name. - The user will see GoodEdit.exe start and the letter.txt contents displayed. Action, Use Process.Cmd and 'Final' Command Files The use of Process.Cmd adds some flexibility to the Action capability across the various Windows operating systems. Specifically it is a bit more robust than simply sending 'command line commands' from within KetuFile. In the case where Process.Cmd is used, there is a 'check' in the checkbox of the Action settings on the Settings Dialog. Process.Cmd can call various other programs to cause various actions to occur, including calling (running) another command file (batch file). In this latter case where one command file (Process.Cmd, is calling another command file, the other command file is the 'Final' command file. Action, Detailed Examples Some of these examples will not use any command files. Some of these examples will use Process.Cmd, alone. Some of these examples will use a 'Final' command file, alone. Some of these examples will use Process.Cmd and a 'Final' command file. Action Examples: Copy1, Copy Encrypted File, Same PC This example assumes that a file has just been encrypted, and the full path file name is showing in the Resulting edit box on the Main Dialog of KetuFile. To use these examples, change the computer names, drive, directories, etc. as appropriate, to be correct for your PC system and LAN. Settings Dialog, Action, A1 Command: E:\D5test\copy1.cmd Settings Dialog, Action, A1 Switches: [resulting] Use Process.Cmd checkbox: NOT checked You must manually create the following batch (command) file. You can of course, copy the following text/code. Just be sure to change the computer names, drive, directories, etc as appropriate, to be correct for your PC system and LAN. Exact Contents of copy1.cmd command file follows: @echo off REM *** REM *** Demo of KetuFile ACTION Capability REM *** copy1.cmd REM *** REM This command file (batch file) demonstrates copying REM an encrypted file from one location to another within REM an individual PC's hard drive. REM The file to be copied is passed to this command file REM as parameter 1, designated by the variable %1 REM The destination directory (folder) location is fixed REM within this command file. Copy %1 E:\Dest Action Examples: Copy1a, Copy Encrypted File, Same PC, Process.Cmd This example assumes that a file has just been encrypted, and the full path file name is showing in the Resulting edit box on the Main Dialog of KetuFile. To use these examples, change the computer names, drive, directories, etc. as appropriate, to be correct for your PC system and LAN. Settings Dialog, Action, A1 Command: E:\D5test\copy1.cmd Settings Dialog, Action, A1 Switches: [resulting] Use Process.Cmd checkbox: checked This example uses the same command files as copy1.cmd. See above. Action Examples: Copy2, Copy Encrypted File, To Another PC This example assumes that a file has just been encrypted, and the full path file name is showing in the Resulting edit box on the Main Dialog of KetuFile. To use these examples, change the computer names, drive, directories, etc. as appropriate, to be correct for your PC system and LAN. Settings Dialog, Action, A1 Command: E:\D5test\copy2.cmd Settings Dialog, Action, A1 Switches: [resulting] Use Process.Cmd checkbox: NOT checked You must manually create the following batch (command) file. You can of course, copy the following code. Just be sure to change the computer names, drive, directories, etc as appropriate, to be correct for your PC system and LAN. Exact Contents of copy2.cmd command file follows: @echo off REM *** REM *** Demo of KetuFile ACTION Capability REM *** copy2.cmd REM *** REM This command file (batch file) demonstrates copying REM an encrypted file from one location to another location REM on a different PC on the LAN (local area netowrk). REM The 'other' computer's name is Ntws1 and that computer REM has a drive mapped as: Ntws1_C REM The file to be copied is passed to this command file REM as parameter 1, designated by the variable %1 REM The destination directory (folder) location is fixed REM within this command file. Copy %1 \\Ntws1\Ntws1_C\Dest Action Examples: Copy2a, Copy Encrypted File, To Another PC, Process.Cmd This example assumes that a file has just been encrypted, and the full path file name is showing in the Resulting edit box on the Main Dialog of KetuFile. To use these examples, change the computer names, drive, directories, etc. as appropriate, to be correct for your PC system and LAN. Settings Dialog, Action, A1 Command: E:\D5test\copy2.cmd Settings Dialog, Action, A1 Switches: [resulting] Use Process.Cmd checkbox: checked This example uses the same command files as copy2.cmd. See above. Action Examples: Copy3, Copy Encrypted File, Same PC, Specify Destination Within Action Edit Box This example assumes that a file has just been encrypted, and the full path file name is showing in the Resulting edit box on the Main Dialog of KetuFile. To use these examples, change the computer names, drive, directories, etc. as appropriate, to be correct for your PC system and LAN. Settings Dialog, Action, A1 Command: E:\D5test\copy3.cmd Settings Dialog, Action, A1 Switches: [resulting] E:\Dest Use Process.Cmd checkbox: NOT checked You must manually create the following batch (command) file. You can of course, copy the following code. Just be sure to change the computer names, drive, directories, etc. as appropriate, to be correct for your PC system and LAN. Exact Contents of copy3.cmd command file follows: @echo off REM *** REM *** Demo of KetuFile ACTION Capability REM *** copy3.cmd REM *** REM This command file (batch file) demonstrates copying REM an encrypted file from one location to another within REM an individual PC's hard drive. REM The file to be copied is passed to this command file REM as parameter 1, designated by the variable %1 REM The destination directory (folder) location is also REM passed as a parameter, %2 Copy %1 %2 There are other obvious, simple variations on copy3.cmd such as copying using Process.Cmd, and copying to another computer on the LAN. Since these types of variations have been shown in detail in examples copy1, copy1a, copy2, copy2a, they will not be repeated here. Action Examples: FTP1, Send Encrypted File by FTP To A FTP Server, Anywhere In The World This example assumes that a file has just been encrypted, and the full path file name is showing in the Resulting edit box on the Main Dialog of KetuFile. KetuFile does not currently have its own FTP client in it. This example uses the FTP capability of the Windows operating system, which can be invoked from the Windows command line. Summary Of This FTP Example - The KetuFile Action Dialog will run a command file that has been previously created, and will pass to that command file, the full path file name of the Resulting file. This command file is named Ftp1.Cmd - The command file (Ftp1.Cmd) will create, on-the-fly, a script file that will control the FTP process. The script file will be named Script1.txt. Then, the command file will continue executing and start an FTP transfer and use the script file to control that transfer. - The reason that the script file is created on-the-fly, is that it is necessary to include, in the script file, the name of the Resulting file to be uploaded. IMPORTANT NOTES: 1] When using this functionality of the Action Dialog, always get the FTP command file working by itself, BEFORE calling that command file from the Action Dialog. As an illustration, this example will have Action Dialog running Ftp1.Cmd. In order to test Ftp1.Cmd without KetuFile, just run another command file to run Ftp1.Cmd. Yes, we have included such a file for you. It is called, logically enough, ftp1-simulate-ketufile.cmd. 2] Be careful when constructing the Ftp command files. Do not place extra blank spaces where they are not needed. This can cause the logon, or transfer process to fail. Be EXTRA careful not to have blank spaces at the end of the lines of the Ftp command files! 3] Make sure that you have 'write' permission to the FTP server. 4] Make sure you are writing into the correct directory (folder) on the FTP server. 5] Make sure you give the 'binary' command, since a KetuFile encrypted file is always binary. 6] It is NOT recommended to have FTP passwords that are 'nothing'. Some FTP servers accept a blank space as nothing, others do not. If you don't want a robust FTP password then make it something simple like 123. Of course a 'not robust' password is a really bad idea. To use these examples, change the computer names, drive, directories, etc. as appropriate, to be correct for your PC system and LAN. Settings Dialog, Action, A1 Command: E:\D5test\ftp1.cmd Settings Dialog, Action, A1 Switches: [resulting] Use Process.Cmd checkbox: NOT checked You must manually create the following batch (command) file. You can of course, copy the following code. Just be sure to change the computer names, drive, directories, etc. as appropriate, to be correct for your PC system and LAN. The contents of the Ftp1.Cmd file follows: @echo off REM *** REM *** Demo of KetuFile ACTION Capability REM *** Ftp1.Cmd REM *** REM This command file accepts a single parameter, REM that is the full path file name to upload to the REM FTP server. It is recommended NOT to have blank REM spaces in the file name or the directories (folders). REM Also, do not add unnecessary blank spaces in the REM following script. Be VERY careful not to have blank REM spaces at the end of the lines! REM This command file now will create a script. REM Script file name is script1.txt REM Make necessary changes for the FTP server REM name where the 192.168.0.102 is currently. REM It could be another IP address (numbers) as REM above, or it could be a 'name' like: REM wxyz.com or ftp.wxyz.com REM replace test1 with your login name. REM replace contem with your password. REM replace Test1 with the directory that you want REM on the FTP server, REM or you can remove that line altogether. > E:\D5test\script1.txt echo open 192.168.0.102 >> E:\D5test\script1.txt echo test1 >> E:\D5test\script1.txt echo contem >> E:\D5test\script1.txt echo cd Test1 >> E:\D5test\script1.txt echo binary >> E:\D5test\script1.txt echo put %1 REM Now the script file has been made. REM Now the FTP process will begin and it will be REM controlled by script1.txt ftp -s:E:\D5test\script1.txt REM If you need to troubleshoot, REM remove the REM from the following statement. REM pause The contents of the Ftp1-simulate-ketufile.Cmd file follows: @echo off REM This command file can be used for testing REM Ftp command files. REM This command file, simulates the Action Dialog REM of KetuFile. REM You must make the necessary changes to file REM names and directories. E:\D5test\ftp1.cmd E:\D5test\abcd.txt.ktu 4.5 Action/Email Dialog This Dialog box allows the invoking of outbound email integration or a programmable 'action'. 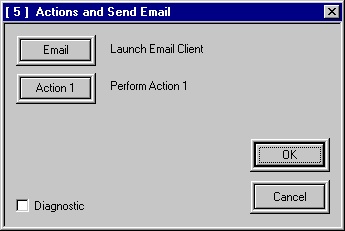 The use of this Dialog is treated exhaustively in the previous paragraphs on the Settings Dialog. Briefly, once a file name is present in either of the edit boxes of the Main Dialog (the top, Original edit box or the bottom, Resulting edit box), then clicking on either the Email or Action buttons of the Action/Email Dialog will cause certain program execution to take place. That program execution is prescribed in the appropriate edit boxes of the Settings Dialog and any ancillary command files (batch files). There are also various tasks that can be initiated/invoked by the Action button that do not involve either the Original or Resulting files. The 'Diagnostic' checkbox shows the command that will be sent, by KetuFile, to the Windows operating system, by clicking the Action button. This checkbox will additionally show the command to be sent by the or the Email button, in the case that the 'Alternate' email approach has been selected in the Settings Dialog. Clicking either the OK or Cancel button will close the Action/Email Dialog box. 5.0 Security Considerations Introduction KetuFile provides encryption of files on your PC. Once the files are encrypted they can be archived or transmitted as you may require. This provides one aspect of security for the information or functionality that you wish to protect. There are other important aspects to security that should be considered and implemented as will be touched-upon later in this paper. Cryptography is the domain of mathematics, and to a lesser extent, engineering, usually electronic engineering. Each time a new technique of encryption is evolved (by mathematicians), it may enjoy a period of time where it is considered to be robust against attacks. What Is A Key? In the KetuFile program, the key is a series of numbers and letters that are used to encrypt a file (message). When the party who receives an encrypted file (message), wishes to de-encrypt to get back the original, this same key will be used. A common use for KetuFile might be to encrypt files (messages) that are to be sent over the Internet, perhaps as attachments to an email. These could be word processor files, spread sheets, images, executables, etc. The Sender will enter a random sequence of numbers and letters into the KetuFile program as the 'key', then tell KetuFile which file to encrypt. The Sender must communicate this exact key to the Recipient, so that the Recipient can enter the same key into his/her KetuFile program to de-encrypt the file (message). The Sender might convey the key by telephone, fax, courier, etc. Attacks When an attack is made on an encrypted file (message), this is referred-to as 'cracking'. Cracking means that someone is trying to de-encrypt your encrypted file (message) without having your key. In attempting to crack a particular technique of encryption, one could divide the approaches into two categories: - Brute force attacks - Intelligent attacks Attacks - Brute Force In a brute force attack, a.k.a. 'exhaustive key search', every possible key (numbers and letters, for example) will be tried, to crack the encrypted file (message). In electronic systems of today, is trivial to make the number of key combinations so large that a brute force attack will be entirely unrealistic with the technology available in the next 10 years or so. Attacks - Intelligent In an intelligent attack, mathematicians use number theory to find a faster way to crack than the brute force attack. Evolution Of Attacks As time goes on, mathematicians will develop new theories and approaches to make intelligent attacks on the latest encryption techniques. It may therefore happen that after a period of time, any given encryption technique is no longer robust, i.e. someone with enough funding can use the newly-developed intelligent approach(s) and can assemble the necessary electronics to crack a file (message) in some reasonable period of time. Why KetuFile? KetuFile seeks to offer an encryption utility program to the Windows(tm) desktop user that acknowledges both of the above possible attacks. Specifically: - a large key, 256 bits or 512 bits, to make a brute force attack take an astronomical amount of time with technology of today and the foreseeable future. - the latest U.S. standard for encryption, the Advanced Encryption Standard (AES), to offer what is possibly one of the strongest resistances against intelligent attacks in the world today. Robustness Of AES There is a large and highly competent community of mathematicians and other scientists in the world today that can offer considered opinions on the robustness of AES and compare AES to older encryption techniques. AES is the result of a global competition for the new U.S. standard. Robustness Of KetuFile The robustness of KetuFile rests on the robustness of AES, the randomness of the key that the user selects and the fact that there are no 'back doors' whatsoever in KetuFile and additionally, there are no built in 'key recovery' features. Said another way, if you lose your key and ask the KetuFile manufacturer for help in recovering the original of the encrypted message, there is nothing we can do for you'. Please read on. Back Doors 'Back Door' is a widely used, and widely defined term-of-art. In the case of KetuFile, it would refer to the existence of a de-encryption process that can be applied to a given encrypted file (message), that does not need the original encrypting key. If an encryption product has such a back door it is, in essence, crippled. There are no 'back doors' whatsoever in KetuFile. Key Recovery 'Key Recovery' means that there is a way that the user's key can be deduced from either the encrypted file (message), i.e. the key is secretly buried in the encrypted file (message), or some other approach allows a third party to get or generate any users key. If an encryption product has such a key recovery feature, it is in essence, crippled. There are no 'key recovery' features whatsoever in KetuFile. On the other hand, if you scour the literature for papers on one of the most popular encryption techniques of today, you will find a reference to the inclusion of key recovery in that product. Some Other Important Areas Of Security Having a robust encryption product for you files is just one aspect of protection. Following are a just a few ideas that you might want to examine and pay attention to in your particular environment. The following are by no means thought to be all inclusive. Key Selection You should only use random keys. This means using sequences of letters and numbers that don't make any sense. Don't use words, phrases, or terms from any language or from any industry or discipline. People who are specialists in cracking encrypted files (messages) have a wealth of 'dictionaries' that contain all of these terms and phrases. If you use such words, phrases or terms it can be billions of times easier (faster) to crack your encrypted file (message). Using a 'dictionary' as just described is called a 'dictionary attack'. Do not use 'existing numbers' in your key. These include all aspects of personal data (phone, street address, SSN, etc.) as well as model numbers of some favorite piece of equipment, and other 'catchy' or familiar numbers. Site Security - Computer If you keep your encryption keys on your personal computer (PC), you need to ensure that the computer is secure. If others have access to your PC then the keys are at risk. Some people use poor (not random as described above) passwords for their PCs and are therefore not too difficult to crack. In addition, the Internet is replete with utility programs that will crack a user or administrator password on a Windows(tm) platform. This means that even a 'good' password can be cracked if enough time is available. In this regard, physical security of the PC is important, i.e. it is in a locked room with intrusion alarms for physical intrusion. If your PC is 'on the Internet' it needs to be protected by a good firewall and have good intrusion detection for electronic intrusion. If you are on the Internet all the time, the risk is greater. Many people shut down their PCs at night to minimize their exposure time to electronic intrusion. Telephone Security In many locations throughout city, urban and rural areas it is very easy to tap a telephone circuit. The technology required is inexpensive, readily available, and easy to use. Physical access points to the telephone circuits can be locked, guarded, and surveilled and voice encryption can be used to address this area of vulnerability. Wireless Intrusion This is a broad area to consider. It includes the use of cordless phones, 'cell' phones of all types, 2-way radios, and the wide variety of wireless internetworking such as Wireless Ethernet (IEEE 802.11x), Blue Tooth, etc. All of these areas are subject to eavesdropping and therefore compromise of security. ELINT - Electronic Intelligence ELINT, a.k.a. SIGINT (signal intelligence) means that information is gathered from a system, such as your PC, by virtue of unintentional radiated emissions. Electronic systems typically radiate radio frequencies (RF), unintentionally. These RF emissions can contain the information that is handled within the PC and therefore could possibly allow it to be intercepted and read - from a distance. This unintentional RF could be emanating from the CPU box (the main enclosure of your PC), the keyboard, the monitor, or any interconnecting wiring such as Ethernet cabling. If you have very critical information to protect, ELINT should be considered. ELINT has been around for a long time and is a very, very mature technology. To Be Confident ... To be most confident of the degree of security that you can achieve with a specific product or specific approach, you should have your entire system of security assessed by experts in this field. 6.0 Contact Information, Tech Support - Use The Email Link Below To Contact Technical Support - Please Be Sure To Include Model Type: Demo, Standard, Pro -- Demo Is Also Referred-To As Model 0 -- Standard Is Also Referred-To As Model 100 -- Pro Is Also Referred-To As Model 200 - Please Also Be Sure To Include Your Registration Number If You Are Requesting Support For The Standard Or Pro Models - Both The Model Type And Registration Number Can Be Found By Running The KetuFile Program And Clicking The INFO Button. |
